
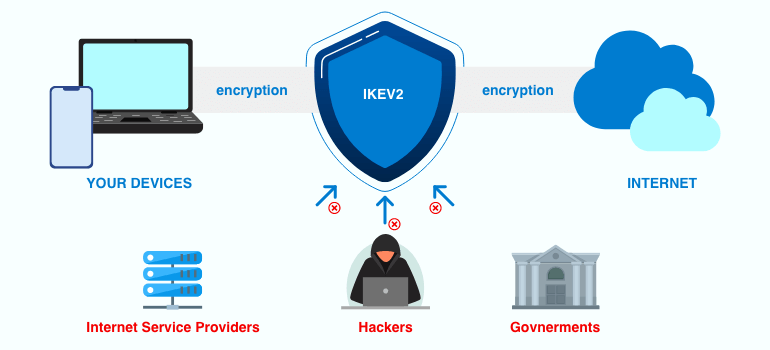
Were you concerned about the security of your internet connection outside your office or home?
Or wanna connect your entertaining or working environment on the street like the cloud service?
The self-hosting ipsec IKEv2 service can help you, and sure, for free 100%.
So, for instance, a small office environment.
What you need as below
- Connectable internet and a router from your internet service provider
- A Linux server, or a NAS with Docker.
- A dedicated fixed IP address or DDNS
If you don’t have the docker, you can follow the steps on the website below to deploy the docker first.
https://docs.docker.com/engine/install/debian/
So, we use Debian 11 Linux with Docker as an example. You can follow the steps the deploy it yourself.
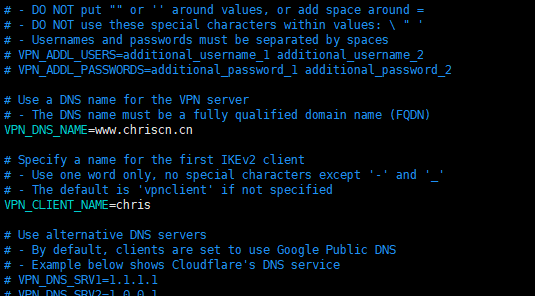
First. we have to prepare the ipsec environment file.
you can download the sample on the link below and modify it for yourself.
https://github.com/hwdsl2/docker-ipsec-vpn-server/blob/master/vpn.env.example
# Note: All the variables to this image are optional.
# See README for more information.
# To use, uncomment and replace with your own values.

# Define IPsec PSK, VPN username and password
# - DO NOT put "" or '' around values, or add space around =
# - DO NOT use these special characters within values: \ " '
# VPN_IPSEC_PSK=your_ipsec_pre_shared_key
# VPN_USER=your_vpn_username
# VPN_PASSWORD=your_vpn_password

# Define additional VPN users
# - DO NOT put "" or '' around values, or add space around =
# - DO NOT use these special characters within values: \ " '
# - Usernames and passwords must be separated by spaces
# VPN_ADDL_USERS=additional_username_1 additional_username_2
# VPN_ADDL_PASSWORDS=additional_password_1 additional_password_2

# Use a DNS name for the VPN server
# - The DNS name must be a fully qualified domain name (FQDN)
# VPN_DNS_NAME=vpn.example.com

# Specify a name for the first IKEv2 client
# - Use one word only, no special characters except '-' and '_'
# - The default is 'vpnclient' if not specified
# VPN_CLIENT_NAME=your_client_name

# Use alternative DNS servers
# - By default, clients are set to use Google Public DNS
# - Example below shows Cloudflare's DNS service
# VPN_DNS_SRV1=1.1.1.1
# VPN_DNS_SRV2=1.0.0.1

# Protect IKEv2 client config files using a password
# - By default, no password is required when importing IKEv2 client configuration
# - Uncomment if you want to protect these files using a random password
# VPN_PROTECT_CONFIG=yes
There are a few things we have to modify.
- VPN_DNS_NAME is your DDNS domain.
- VPN_CLIENT_NAME is your default user name (first IKEv2 user)
below as my sample.
My environment file is located at /usr/local/ipsec/ipsec.env
Use the command below to run the container
it will download the docker image hwdsl2/ipsec-vpn-server:latest automatically.
docker run -d --privileged \
--env-file /usr/local/ipsec/ipsec.env \
-v ikev2-vpn-data:/etc/ipsec.d \
-v /lib/modules:/lib/modules:ro \
-p 500:500/udp \
-p 4500:4500/udp \
--name=ipsecServer \
--restart=always \
hwdsl2/ipsec-vpn-server:latest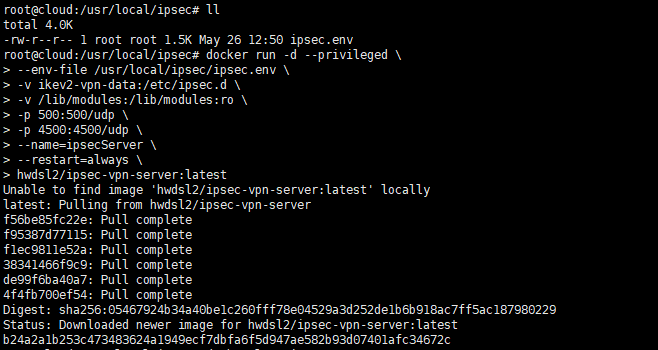
So the ipsecServer has already been running.
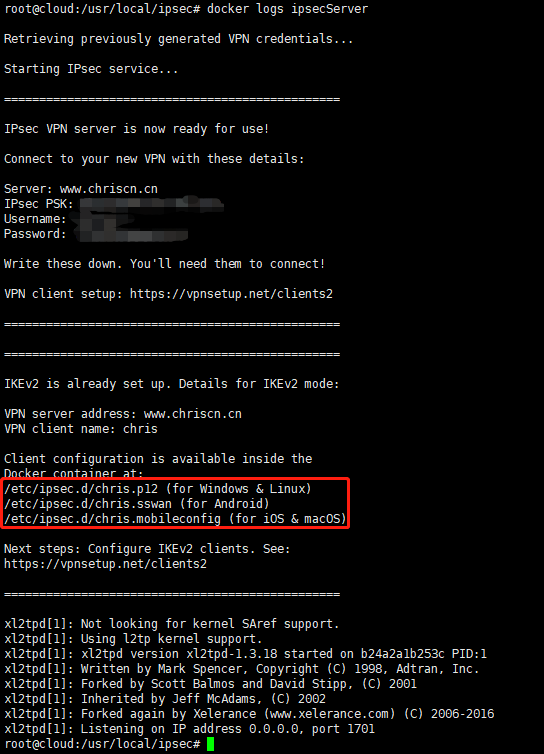
We can see It already hosted the IKEv2 cert file inside the docker volume ikev2-vpn-data
and now we have built a soft link to access the cert file
use the command below to build a folder and link to volume.
mkdir /usr/local/ipsec/ipsec.d
ln -svf /var/lib/docker/volumes/ikev2-vpn-data/_data/ /usr/local/ipsec/ipsec.d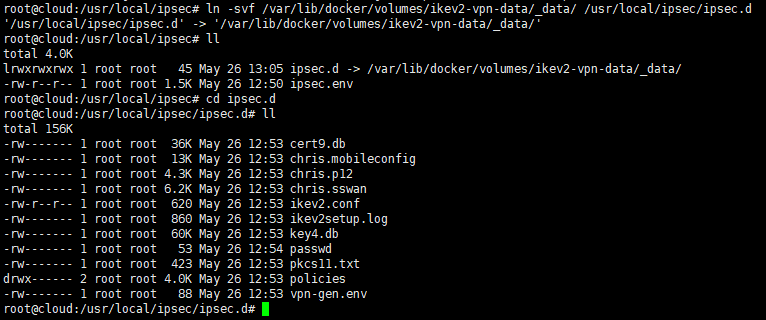
So, Until now, the ipsec IKEv2 server deployment has already been finished, and the ipsecServer running at UDP500 and UDP4500 on this server.
Next, we have to port forward the router’s UDP500/4500 from WAN to this server, as the sample below.

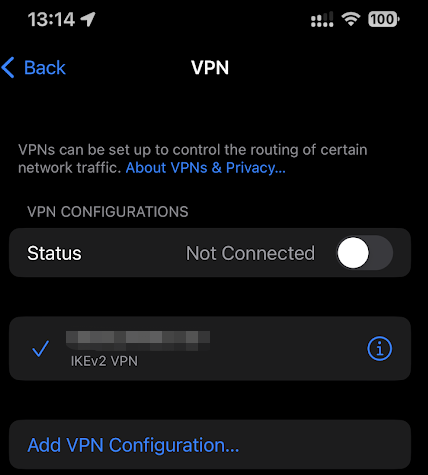
At last, we just need to put the cert file to your devices and deploy the cert, so all you need to do were finish.
and then your iPhone will deploy the IKEv2 VPN itself automatically.
The only thing you have to do is enjoy it.
relative:
And you can use the command below to manage your ipsec server to add or remove users.
# Add a new client (using default options)

docker exec -it ipsecServer ikev2.sh --addclient [client name]

# Export configuration for an existing client

docker exec -it ipsecServer ikev2.sh --exportclient [client name]

# List existing clients

docker exec -it ipsecServer ikev2.sh --listclients